Collections Management
|
|
The intent of best practices is to provide users with a view of the recommended features/practices that enable them to derive the most value out of Collections Management. |

The following are the recommended best practices for Collections Management:
The idea of “collectible amount” is for Collectors to follow up only on relevant amounts that they have to collect on a particular customer at any point of time.
There are often delays in payments getting posted to the ERP even after the customer has already made the payment. It would be intrusive to follow up on such payments. It will be more acceptable to the customers if reminders are sent only on the balance for which they are yet to make a payment.
Additionally, if there are any disputes that the customers have raised, and which have been resolved, they would not appreciate further reminders on the disputed amount.
Taking these matters into consideration, Collections Management displays an amount called “collectible amount” that you can view and consider for your daily collection activities.
Collectible Amount = Open Amount - (Valid Dispute Amount) - (Paid Amount) – (Committed Amount)
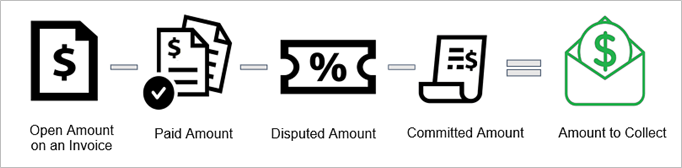
At the account level, any combination of these three amounts (disputed amount, paid amount, and committed amount) can be configured to be excluded from the collectible amount according to the requirements.
Working with Collectible Amount
In the Worklist, the Collectible Amount column displays the individual collectible amount for each customer who has come to the Worklist for that particular day.
The collectible amount is first calculated at the invoice level and then aggregated at the customer level. P2Ps present on the customer are subtracted from this aggregated amount to display the final collectible amount against each customer.
- Instead of prioritizing customers with a high balance past due amount, it would be wiser to prioritize customers based on collectible amount since it is the most significant amount that you can collect on.
- If there any payments or disputes present on certain invoices, you can follow up with the customer and request a payment on the collectible amount rather than the entire open amount on those invoices.
- While sending reminders, instead of configuring open amount or past due amounts, you can configure the collectible amount to be sent as the Amount Due for the customer.
Using collectible amount to follow up is recommended because it is the most relevant and up-to-date amount that you can share with the customers. This will possibly speed up the process of you receiving payments on time.
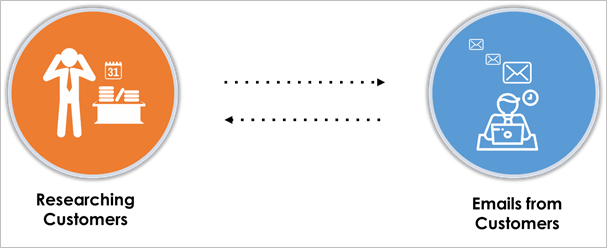
Using the Email Inbox feature, you can keep all incoming and outgoing collection emails in one place. The sent and received emails are grouped by their subjects and presented in the tab in the form of a conversation.
Maintaining emails through a separate email client (external to HighRadius) involves a lot of context switching since you would have to reference and maintain information in both Collections Management and the email client. The Collections Email Inbox feature ensures that all the information is presented at one location and you will not have to switch to another application for research while working on customers. Compared to other email applications, the HighRadius Email Inbox outperforms in the sense that it adds context to received emails by mapping them automatically to the customer.
- By configuring a common email ID where all the emails will be received, you can view any email that you have sent from the system and any responses that you have received. Emails sent to you by the customer are also captured and presented in the Email Inbox.
- You can respond to the emails from within the Collections tool using the Reply/Reply All/Forward options.
- From the email Compose windows, you can add attachments including the latest account statement.
- You can manually mark emails as Read, Unread, Archived, or Deleted using the Mark as button.
- In the Email Inbox subtab in Customer Details, you can view all the sent and received emails for that particular customer.
- With the AI edition of Collections, intent of the sender is also identified and actions based on that will be recommended to you. You can complete these actions with the click of a button directly while reading the email. For example, if the email intent is identified as a dispute, you can create a dispute with a button-click.
The Email Inbox feature helps you maintain all collections related information within the tool and you will not have to copy information from the external email client into the tool or vice versa. This way, no information is lost and everything is presented in a compact manner within the tool. It also saves you considerable time in your day-to-day activities. There’s improvement of productivity due to the availability of everything in one single application and the automation of certain steps.
The in-app calling facility helps you create a complete account of collection activities, including phone conversations, in one place.
In the absence of an in-app calling facility, you would have to look up the contacts of the customer from the Customer Details screen, manually key in the numbers to place the call, and take notes while on call. Then you have to come back to the tool to record all this information as a call log. This process is prone to human errors since you might forget to record the call or capture relevant information in its entirety.
With the in-app calling facility, the process is highly simplified. You can choose a customer and call them from within the tool. The system will automatically identify the specific frequent contact of the customer that you place your calls to (or you can define a default contact). From the dial pad, you can also key in a phone number or choose any other contact to whom you want to place the call.

A Notes section is available in the Call window, where you can take notes while on call. You can also choose to associate the call recording with specific invoices if you have spoken about any during the call.
After the call, you can click Save to create a call record in the system against that particular customer for the associated invoices (if any). This record can be easily accessed with the click of a button through Advanced Search capabilities.
In addition to saving time, the in-app calling facility also eliminates the risk of losing information that comes with making calls on your phone.
The Invoices tab is useful for gaining quick access to invoices across customers to tag, make notes, and create P2Ps and disputes.
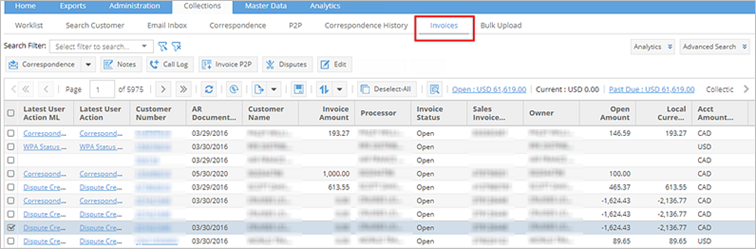
- When customers initiate a call, it is often on specific invoices that they wish to follow up or provide information. Using the Invoices tab, you can access these invoices promptly.
For instance, if the customer quotes an invoice number while on call, you can use the Advanced Search option to input the number in the Invoice Number field and pull up that particular invoice. This is more efficient and time-saving than finding the customer in the Worklist or Search Customer and then searching for the invoice number.
- You can also perform actions on the invoices while on call. Whatever possible actions can be taken on an invoice, such as creating P2Ps and disputes, taking notes, creating call log records, editing invoice parameters, and so on can be performed from within the Invoices tab.
The Invoices tab is helpful when you want to work at the invoice level and saves you the effort of navigating to Customer Details, finding the invoices, and then performing actions on them.
The Invoice Tracking Automation (ITA) functionality automates the collation of invoice payment status from different customer portals.
Through ITA, the HighRadius Collections system is able to access all the customer portals and acquire information on any scheduled payment dates and comments or notes that are posted by your customers on their portals. It seamlessly works in the background to collect and transfer this information into the HighRadius system and link the information to the appropriate invoices as well as customers.
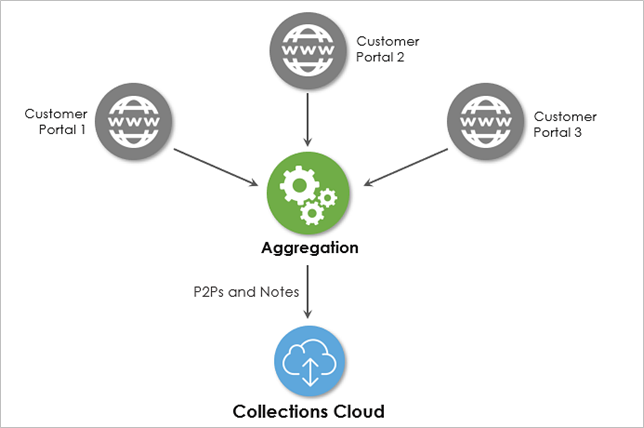
In addition to capturing invoice status, P2Ps and disputes are also created based on the status. Skipped invoices are identified so that Collectors can provide invoice copies or other information about these invoices proactively. This minimizes the chance of delay in payments. Invoices with the probability of being disputed are also identified.
Using this portal aggregation technology will save you the effort of visiting the customer portals individually on a day-to-day basis to get information on specific invoices. All that information can be brought into the system and presented against the open invoices that are already available.
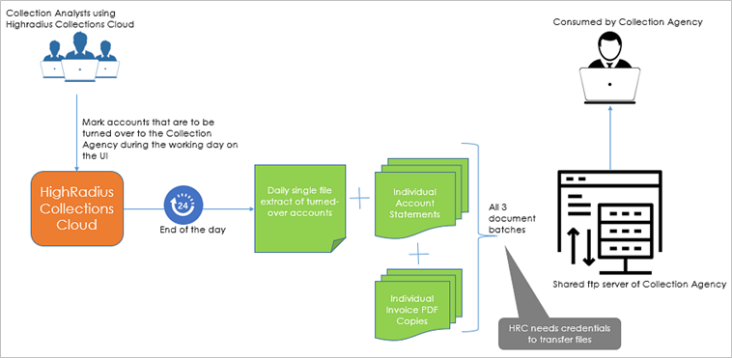
Collection Agency Data Exchange (CADE) is an integration capability provided by Collections Management to automate the process of exchanging information between HighRadius Collections and Third-Party Agencies (TPA).
While using the HighRadius Collections Management through the day, you might identify certain delinquent customers on which you have exhausted your collection attempts and wish to engage the services of a third-party collection agency. At the end of the day, these accounts that are to be turned over to a collection agency are picked up by the system. All the attributes required by the specific third-party agency are then collated into files and transferred to their servers. You can also revoke the transfer if you acquire some additional information after you have transferred the customer.
Transferring Customers/Invoices to TPA
The TPA Transfers button is available in the Worklist/ Search Customer tabs for customer level TPA transfers and in the Open Items subtab for invoice level transfers. Once the customers/invoices have been transferred and the agency picks them up, those customers/invoices will be marked as having been transferred to a third-party agency. You can revoke the transferred customers/invoices by clicking the Revoke from TPA option in TPA Transfers.
This process could be a manual file generation process for some businesses. Instead of manually logging in to the third-party portal and providing all the details of the customers/invoices such as name, invoice number, open amount, and so on, you can eliminate the effort required for this by subscribing to the Collection Agency Data Exchange program. It will fully automate the transfer process for you.